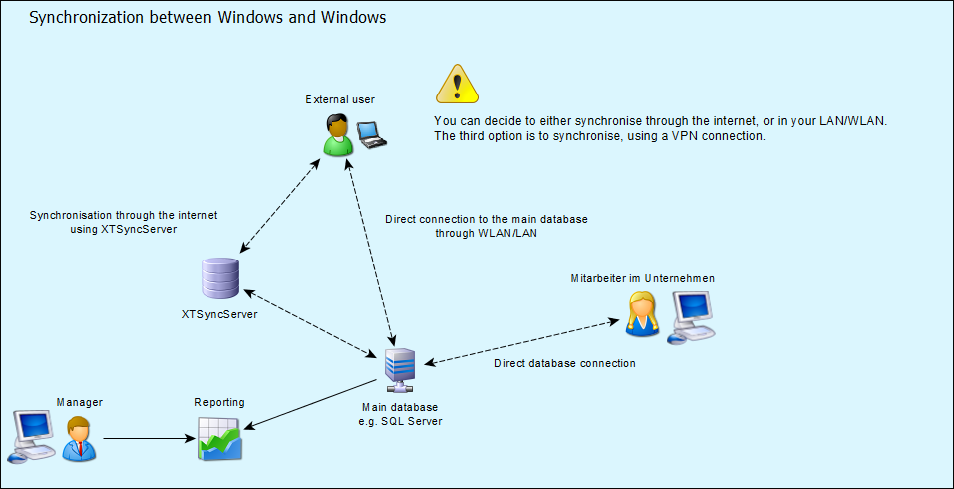
The synchronization module allows you to time your projects offline. So you don't need a connection to the main database all the time. You need an additional synchronization module and if you want to synchronize over the internet, also the XTSyncServer.
The sync user times all projects on a locally installed SQLite or Microsoft Access database on the Windows Laptop. In the sync client version (once activated), there's an additional button in the menu (Program -> Synchronize) to synchronize with the main database.
In order to activate the synchronization, a sync file must be created from an administrator in Xpert-Timer, while connected to the main database. This sync file must be placed in the program folder of Xpert-Timer on the laptop and will be automatically activated once Xpert-Timer start up. It will guide you through your first synchronization.
Please follow following instructions, step by step, to activate your synchronization:
1. Install a version of Xpert-Timer Pro (Complete install with SQLite or Access database) on your laptop.
-- The laptop needs a database to save all timestamps in.
2. Start Xpert-Timer on a computer that's connected directly to the main database.
-- You need this computer to create a sync-file, which includes all the database connections to the main database.
3. Make sure your additional module "Synchronization" is activated in the configuration of your Xpert-Timer with connection to the main database.
-- Point to "Configuration" -> Additional and check the box for "Synchronization".
4. Point to the user management, or the user settings (in single user mode), double click on the user and navigate to the tab "Additional modules". Activate the synchronization by checking the box "Activate data synchronization for this user".
-- Here you create the synchronization file for the user with the laptop or Android.
5. Save the sync-file in the program folder of Xpert-Timer on your laptop, that wants to synchronize.
-- In this sync file all information is saved, that the laptop needs to transfer the data to and from the main database. Save the file in your program folder, where your program xperttimer.exe is saved.
6. Start up Xpert-Timer on your laptop -> The synchronization file must be detected automatically.
-- When you start up Xpert-Timer the first time, after you've created the sync file and placed it in the installation folder, Xpert-Timer will recognize this sync file and will automatically ask for activation for the synchronization. You don't need to activate any license file on the laptop as the data is also saved in the database.
7. Synchronize using the button in Program -> Synchronize database.
-- From now on there will be an additional menu for synchronizing your database. As soon as you are in the LAN/WLAN or otherwise connected to the network and the main database is accessible, you can transfer the data.
8. Delete the activation file
- The activation file is no longer needed. Please delete these from your program directory to avoid reactivation.